Wednesday, July 29, 2009

Error "The Disk Defragmenter is not installed on your computer" when launching Disk Defragmenter in Windows Vista

Symptoms

When you open the Properties dialog box for a local hard disk and click the Tools tab, one of the following symptoms may be seen:

  • The Defragment Now button is unavailable
  • When you click Defragment Now, you receive the following error message:

The Disk Defragmenter is not installed on your computer. To install it, double-click the Add or Remove Programs icon in Control Panel, click the Install/Uninstall tab, and then follow the instructions on your screen.

Resolution

  • Click Start, type regedit.exe and press ENTER
  • Navigate to the following location:

HKEY_LOCAL_MACHINE \ SOFTWARE \ Microsoft \ Windows \ CurrentVersion \ explorer \ MyComputer \ DefragPath

  • In the right-pane, double-click (default) and set its data as follows:

C:\Windows\System32\dfrgui.exe

  • Close Regedit.exe

Automate

To automate the above, you may use the REG file (dfrgfix_vista.reg) attachment below.

Error "Access is denied" when you try to log off an user account using Task Manager Users tab in Windows Vista

Symptom

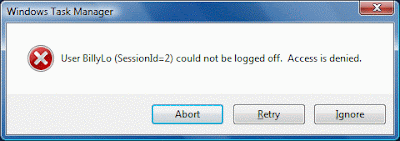
When you use the Task Manager Users tab to log off an user account in Windows Vista, the following error may appear:

User (SessionId=2) could not be logged off. Access is denied.

Resolution

This happens if Task Manager is not running under administrative privileges. To log off an user account, Task Manager must be run with administrative privileges. Follow one of these methods:

Method 1

  • Open Task Manager (taskmgr.exe) and click the Processes tab
  • Click Show processes from all users
  • When you are prompted for an administrator password or confirmation, type the password or provide confirmation.

(Task Manager now runs with administrative privileges.)

  • Switch to the Users tab and log off an user account.

Method 2

  • Click Start, click All Programs, click Accessories, right-click Command Prompt, and then click Run as administrator.
  • If you are prompted for an administrator password or for confirmation, type your password, or click Continue.
  • At the command prompt, type taskmgr.exe, and then press ENTER.

(Task Manager starts with administrative privileges.)

  • Switch to the Users tab and log off an user account.

Unable to open .PPS attachments directly from Windows Mail in Windows Vista

Symptom

When you open a .PPS file that came as a mail attachment in Windows Mail, you may see the Open / Cancel dialog box. When you select Open, the following error may be displayed:

This file does not have a program associated with it for performing this action. Create an association in the Set Associations control panel.

This may happen even though you have PowerPoint Viewer 2003 or 2007 installed. However, the same file may open correctly when saved to disk, and then viewed. Note that this problem does not occur if you have Microsoft Office or PowerPoint installed.

This article is applicable for Windows Vista, with PowerPoint Viewer 2003 or PowerPoint Viewer 2007 installed. For a Windows XP version of this article, see article Unable to open .PPS attachments directly from Outlook Express?

Cause

This happens if the Open command is missing for .PPS and/or .PPT file types.

Resolution

To resolve the issue, follow these steps:

For .PPS files (Microsoft PowerPoint Slideshow)

  • Click Start, type regedit.exe and press ENTER
  • Navigate to the following branch:

HKEY_CLASSES_ROOT\PowerPointViewer.SlideShow.11\shell\Show

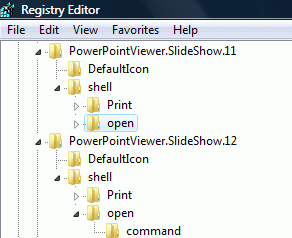
  • Right-click Show and click Rename
  • Type the word Open so that Show is replaced by Open command
  • If you have PowerPoint Viewer 2007 installed, repeat the above steps in this key, as well:

HKEY_CLASSES_ROOT\PowerPointViewer.SlideShow.12\shell\Show

  • After changing Show to Open, close Registry Editor window.

For .PPT files (Microsoft PowerPoint Presentation)

  • Click Start, type regedit.exe and press ENTER
  • Navigate to the following branch:

HKEY_CLASSES_ROOT\PowerPointViewer.Show.11\shell\Show

  • Right-click Show and click Rename
  • Type the word Open so that Show is replaced by Open command
  • If you have PowerPoint Viewer 2007 installed, repeat the above steps in this key, as well:

HKEY_CLASSES_ROOT\PowerPointViewer.Show.12\shell\Show

  • After changing Show to Open, close Registry Editor window.

Screenshot

(Fig 1) Show is renamed as Open

Error "Registry editing has been disabled by your administrator" when you open the Registry Editor in Windows Vista

Symptom

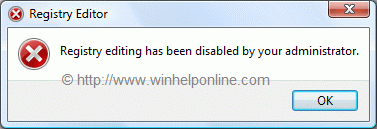
When you attempt to start the Registry Editor (regedit.exe) in your Windows Vista system, you may receive the following message:

Registry editing has been disabled by your administrator

Resolution

If the above error message is shown in a standalone system, then it may be a result of Malware infection. It is also possible that the DisableRegistryTools policy had been enabled by a third-party tweak program which you may be using. It's highly advisable to follow up with a complete system checkup for Virus and Malware, especially when you're unsure about the cause.

Note: If your system is connected to a domain, your network administrator may have enabled the DisableRegistryTools Policy setting. In that case, you'll need to contact the network administrator to relax this restriction, if need be.

Method 1 - Using Group Policy Editor

If you are using an edition of Windows Vista (Windows Vista Business, Enterprise and Ultimate editions) which includes the Group Policy Editor, follow these steps:

  • Click Start, type gpedit.msc in the Search box, and press ENTER
  • Go to the following branch:

User Configuration | Administrative Templates | System

  • Double-click Prevent access to registry editing tools
  • Set it as Not Configured

Important: If it's already set to Not Configured, set it to Enabled and click Apply. Then repeat the steps and revert the setting back to Not Configured. This removes the registry based policy if set already.

Method 2

This method should work in all editions of Windows Vista.

  • Download reg_enable.vbs attached at the end of this article, and save it to Desktop
  • Open an elevated command prompt. To do this, click Start, click All Programs, click Accessories, right-click Command Prompt, and then click Run as administrator. If you are prompted for an administrator password or for a confirmation, type the password, or click Allow.
  • Switch to your Desktop directory by typing the following command, and then pressing ENTER:

cd /d %userprofile%\desktop

  • Then, type the following command and press ENTER

wscript.exe reg_enable.vbs

  • Type EXIT to close the Command Prompt window.

If everything worked fine, the DisableRegistryTools policy should have been removed by now. See if you're able to launch Regedit.exe now.

Error "Windows Sidebar is managed by your system administrator" when you try to open the Windows Sidebar

Question

When I try to open the Windows Sidebar in my Windows Vista system, I get the following error, and the Sidebar does not open:

Windows Sidebar is managed by your system administrator.

Answer

If your system is connected to a domain, the network administrator may have enforced the Turn off Windows Side bar Policy.

(For standalone systems) If you are using an edition of Windows Vista (Windows Vista Business, Enterprise and Ultimate editions) which includes the Group Policy Editor, follow these steps to remove the Turn off Windows Side bar Policy:

  • Click Start, type gpedit.msc in the Search box, and press ENTER
  • Navigate to the following branch:

Computer Configuration | Administrative Templates | Windows Components | Windows Sidebar

  • Double-click Turn off Windows Sidebar
  • Set it as Not Configured
  • Repeat the same in the following branch:

User Configuration | Administrative Templates | Windows Components | Windows Sidebar

  • Close the Group Policy Editor window.

Important: If it's already set to Not Configured, set it to Enabled and click Apply. Then repeat the steps and revert the setting back to Not Configured. This removes the registry based policy if set already.

Registry edit

Click Start, type regedit.exe and press ENTER

Navigate to the following branch:

HKEY_LOCAL_MACHINE \ SOFTWARE \ Microsoft \ Windows \ CurrentVersion \ Policies \ Windows \ Sidebar

In the right-pane, delete the value named TurnOffSidebar (if found)

Repeat the same in the following branch:

HKEY_CURRENT_USER \ SOFTWARE \ Microsoft \ Windows \ CurrentVersion \ Policies \ Windows \ Sidebar

Exit Registry Editor.

Error "800A0046 - Permission Denied" when installing the Windows Installer Cleanup Utility in Windows Vista

Symptom

When you try to install the Windows Installer Cleanup Utility in Windows Vista, the following error may appear:

Script: C:\Users\Ramesh\AppData\Local\Temp\IXP000.TMP\StartMsi.vbs
Line: 17
Char: 1
Error: Permission denied
Code: 800A0046
Source: Microsoft VBScript runtime error

Cause

With the User Account Control (UAC) enabled in Windows Vista, you may be denied write access to the Program Files directory and its sub-directories by default. The error above occurs when the Windows Installer Cleanup Utility's setup script (StartMSI.vbs) attempts to copy the extracted files from the Temporary folder to the C:\Program Files\MSECache\WICU3 folder.

Resolution

To resolve the problem, you need to install the Windows Installer Cleanup Utility as administrator. To do so, right-click the setup file (msicuu2.exe) and choose Run as Administrator. If you are prompted for an administrator password or for confirmation, type your password, or click Continue.

Error "Internet Explorer was not able to open this Internet site" when using Help and Support in Windows Vista

Symptom

When you open Windows Help and Support in Windows Vista and search for a word or phrase, the following error may occur:

Internet Explorer cannot download / from Help.

Internet Explorer was not able to open this Internet site. The requested site is either unavailable or cannot be found. Please try again later.

Resolution

This happens if the Content Type registry setting for .xml file types is incorrect. To resolve the problem, use one of the following methods:

Method 1

Open an elevated Command Prompt window, and run the following command:

regsvr32 msxml3.dll

Press ENTER.

Note: To open an elevated Command Prompt window, click Start, click All Programs, click Accessories, right-click Command Prompt, and then click Run as administrator.

Method 2

Download xmlfix_vista.reg available at the end of this article and save to Desktop. Right-click on the downloaded file and choose Merge.

Error "VBScript is not installed" when installing iTunes in a Windows Vista computer

Symptom

When you install iTunes in a computer running Windows Vista, you may receive the following error:

iTunes could not be installed because Visual Basic Script (VBScript) is not installed or has been disabled. Make sure VBScript is installed, turn off script blocking in anti-virus and personal firewall software, re-register VBScript, and then install iTunes.

Resolution

iTunes official knowledgebase states the following:

If you see this error, it may be because the Windows Installer technology is unable to process the Visual Basic Script embedded inside the iTunes and QuickTime Installers.

For more information, read the article: iTunes and QuickTime for Windows cannot be installed without Visual Basic Script (VBScript)

In Windows Vista, you'll need to register the module vbscript.dll from an elevated Command Prompt window. To open an elevated Command Prompt, click Start, click All Programs, click Accessories, right-click Command Prompt, and then click Run as administrator.

Type the following in the Command Prompt window and press ENTER

regsvr32 %systemroot%\system32\vbscript.dll

And then type the following to exit the Command Prompt window.

EXIT

Error "This language is no longer available for spell checking" when using the Spell Checker in Windows Mail

When you use the Spell check feature when composing a new mail message in Windows Mail, the following error message may be displayed:

This language is no longer available for spell checking. Please select another in the spelling options dialog.

Resolution

This happens if the default language is not set in the spell checker options. Follow these steps to resolve the problem:

1. Start Windows Mail

2. From the main screen in Windows Mail, click the Tools menu and choose Options...

Note: In step 2, make sure that you select the Tools menu from the main window, not the New Mail message window.

3. Click the Spelling tab From the Language drop-down, select English even though it's already listed as the default selection, and click Apply.

4. Click OK

Error "There is no script engine for file extension" when running .js files

Symptom

When you attempt to run a .js (JScript Script File) file, one of the following errors may occur:

Can't find script engine "JScript" for script "filename.js".

There is no script engine for file extension ".js".

Resolution

This happens if the .js file class data is missing or incorrect. Follow these steps to resolve the problem:

Instructions for Windows Vista

Open an Elevated Command Prompt window. To do so, click Start, click All Programs, click Accessories, right-click Command Prompt, and then click Run as administrator.

  • Type the following command and press ENTER:

regsvr32 %systemroot%\system32\jscript.dll

  • Type EXIT to close the Command Prompt window
  • Download vista_js_fix.reg from the Attachments section (scroll below), and save it to Desktop
  • Right-click vista_js_fix.reg and choose Merge
  • Click Yes when asked for confirmation.

Instructions for Windows XP

  • Click Start, Run and type:

regsvr32 %systemroot%\system32\jscript.dll

  • Press ENTER
  • Download xp_js_fix.reg from the Attachments section below, and save it to Desktop
  • Right-click xp_js_fix.reg and choose Merge
  • Click Yes when asked for confirmation.

If the above does not solve the problem, then download and install Windows Script 5.7 from the following Microsoft Web site:

Download details: Windows Script 5.7 for Windows XP

Error "Windows Fax and Scan cannot run as it cannot access your documents folder" when launching Windows Fax and Scan

Symptom

When you attempt to launch Windows Fax and Scan, the following error may occur and Windows Fax and Scan does not open:

Windows Fax and Scan cannot run as it cannot access your documents folder. Please ensure that Windows Fax and Scan can access that folder

Cause

This behavior is observed if:

  • You've relocated the Documents folder to a network or removable drive earlier, and the path is currently unreachable.

(or)

  • The Documents folder is pointing to a Root folder of a fixed drive (example, D:\). More information...

Resolution

For Case 1: See article Nothing happens when you click on a shell folder link in the Windows Vista Start menu to know how to fix the shell folder path manually.

For Case 2: Revert back the Documents folder to its original location, or relocate it to a folder which is at least one level deep from the Root folder (Example: D:\Documents, or D:\Users\Documents etc). To do so, follow these steps:

  • Create the destination folder first
  • Click the Start button
  • Right-click Documents, and choose Properties
  • Select the Location tab
  • Click Move and select the target folder
  • Click Apply
  • Click Yes when you're prompted to move the files to new location
  • Click OK

"Internal Error 2755.110" when installing the Windows Installer Cleanup Utility

Symptom

When you install the Windows Installer Cleanup Utility, the following error occurs and the setup is aborted:

Internal Error 2755.110

Proposed solution

Clearing the TEMP folder

Restart Windows. Click Start, Run and type %temp% and press ENTER. Delete all the files in the TEMP folder, ignoring "file in use" error messages if any. Try installing Windows Installer Cleanup Utility (WICU) now. If the problem persists, try the method discussed below.

Extracting the setup files to a folder

  • Download and install WinZip or any other third-party .zip handler
  • Start WinZip and open the WICU setup wrapper msicuu2.exe
  • Extract the following files to a folder on the Desktop.
  • msicuu.exe
  • msicuu.msi
  • MsiZapA.exe
  • MsiZapU.exe
  • readme.txt
  • StartMsi.vbs
  • Then open the folder where you extracted the above files.
  • Double-click StartMsi.vbs to run it.

Installation should now complete successfully.

Unable to open .DOC attachments from Windows Mail

Symptom

When you attempt to open a .DOC file that came as a mail attachment in Windows Mail, the following error may occur:

This file does not have a program associated with it for performing this action. Create an association in the Set Associations control panel.

This may happen even though you have Microsoft Word installed. Also, the same file may open correctly when saved to disk and then viewed.

This article and the utility discussed below, are applicable for Windows® Vista systems with Microsoft® Word installed.

Resolution

To fix the problem, download DocFix.zip from the Attachments section below, and save it to Desktop. Unzip the contents (docfix.exe and readme.txt). Open readme.txt to read it. Then run the file DocFix.exe. When you are prompted for an administrator password or confirmation, type the password or provide confirmation.

Important note: After running the fix, in some cases, you'll need to open Start - Default Programs - Associate a file type or protocol... and reset .doc file type association for Microsoft Word even though it's already associated with Microsoft Word.

If that does not fix the problem, see if repairing Microsoft Word helps.

Editor's note: In future I may update this tool so that it works with Microsoft® Works as well. You may visit this page later for any updates.

Unable to open .PDF attachments from Windows Mail

Symptom

When you attempt to open a .PDF file that came as a mail attachment in Windows Mail, the following error may occur:

This file does not have a program associated with it for performing this action. Create an association in the Set Associations control panel.

This may happen even though you have Adobe Reader installed. Also, the same file may open correctly when saved to disk and then viewed.

This article applies to Windows® Vista systems with Adobe Acrobat Reader (v8.1 as of this writing) installed.

Proposed solution

This error occurs if the file type association for .PDF is incorrect. You can fix this using the steps below.

Removing .PDF file type association

  • Download unassoc.zip and save it to Desktop
  • Extract the contents to a folder and run the file unassoc.exe
  • Select .PDF from the list and click Delete file type
  • The file type association for .PDF is now removed.

Repairing Adobe Acrobat Reader

  • Right-click on the Adobe Reader shortcut and click Run as administrator.
  • From the Help menu in Adobe Reader, click Repair Adobe Reader Installation.

The repair process should fix the .PDF file type association. Restart Windows and see if you're able to open .PDF attachments directly from Windows Mail.

Error 0x80070032 when creating a System Restore point in Windows Vista

Symptom

When you try to create a System Restore point in Windows Vista, the following error may occur:

Could not create the scheduled task for the following reason:

The request is not supported. (0x80070032)

Resolution

This happens if the Windows Event Log and the Task Scheduler services are disabled. Follow these steps to fix the problem.

1. Click Start, Services.msc. Press {ENTER}

2. Double-click Windows Event Log

3. In the Start type list box, ensure that Automatic is selected

4. Click Start to start the service, if it's not already running

5. Close the Services console

6. Restart Windows.

If the problem persists, check the status of the Windows Event Log and Task Scheduler services. If the Task Scheduler service is in a disabled state, then download the file schedule.reg from the Attachments section below. Save the file to the Desktop, and double-click the file to merge the contents with the registry. Click Yes when asked for confirmation.

Restart Windows.

How to create a System Restore point in Windows Vista

Summary

This article explains how to create a System Restore snapshot manually in Windows Vista.

Creating a System Restore point manually

  • Right-click on the Computer icon in the Desktop, and choose Properties
  • In the left pane, click System Protection
  • Alternately, to access the System Protection tab directly, click Start and type SystemPropertiesProtection.exe.
  • If you are prompted for an administrator password or confirmation, type the password or provide confirmation.

  • Click the System Protection tab, and then click Create.

  • In the System Protection dialog box, type a description, and then click Create.

Creating a System Restore point using a shortcut

For a more elegant way to create a System Restore point using Script in Windows Vista, check out our article Create System Restore Points Quickly using Script in Windows Vista and Windows XP.

Alternately, you may use the method below:

Copy the contents below to a Notepad document, and save it to a file name with .vbs extension (Example: createrp.vbs) and close Notepad.

set SRP = getobject("winmgmts:\\.\root\default:Systemrestore")
CSRP = SRP.createrestorepoint ("Created a Restore Point now", 0, 100)
If CSRP <> 0 then
Msgbox "Error " & CSRP & ": Unable to create System Restore point"
End if

Right-click on the Desktop and select New - Shortcut

Create a shortcut with the following target:

wscript.exe c:\scripts\createrp.vbs

Note: The above assumes that the createrp.vbs script is present in the c:\scripts folder. If that's not the case, change the Path accordingly.

Name the shortcut file name as Create Restore Point

Running the script

To create a System Restore point, run the script with elevated mode. To do so, right-click on the newly created shortcut (Create Restore Point.lnk) and choose Run as administrator. When you are prompted for an administrator password or confirmation, type the password or provide confirmation. A System Restore point will automatically be created.

How to Clear Past Items from the Notification Area in Windows Vista

Summary

This article describes how to clear the Past Items list in the Customize Notifications window.

Clearing the items in Customize Notifications dialog

Automate: You can automate the following task using the script clearpastitems.vbs available for download at the bottom of this page. The script can be run in Windows XP and Windows Vista systems.

To clear the Past Items list manually, follow the steps below:

  • Click Start, type regedit.exe and press Enter
  • Navigate to the following branch:

HKEY_CURRENT_USER\Software\Classes\Local Settings\Software\Microsoft\Windows\CurrentVersion\TrayNotify

  • Delete the values IconStreams and PastIconsStream
  • Quit the Registry Editor
  • Open Task Manager (taskmgr.exe), click the Processes tab
  • Select Explorer.exe, and then click End Process
  • In Task Manager, click File, click New Task, type explorer, and then click OK.

VBScripts and UAC elevation

VBScripts and UAC elevation

With User Account Control (UAC) enabled in Windows Vista, one needs to open an elevated Command Prompt in order to run scripts under administrative privileges. Although the elevated Command Prompt accomplishes the task, the question How to run as script under elevated privileges, without using the Command Prompt? comes to our mind.

Applications can make use of manifest files (using RequireAdministrator flag) to show the elevation dialog when run. As far as I know, there is no such option for scripts. Using the ShellExecute method, you can elevate a script by passing the runas parameter. Thanks to Jim Barry for tipping me off about the ShellExecute method of Shell.Application object. Using Jim's suggestions, my original script was condensed down to a great deal. Use one of these methods to run VBScripts elevated.

Method 1

This re-launches the current VBScript as administrator (elevated) if the script has no command-line arguments passed. When re-launching the script as administrator, simply pass a bogus argument so that the script does not run in a cyclic loop.

If WScript.Arguments.length =0 Then
Set objShell = CreateObject("Shell.Application")
'Pass a bogus argument with leading blank space, say [ uac]
objShell.ShellExecute "wscript.exe", Chr(34) & _
WScript.ScriptFullName & Chr(34) & " uac", "", "runas", 1
Else
'Add your code here
End If

Method 2

This method uses a stub or wrapper script which runs the main VBScript elevated using the runas verb.

Set objShell = CreateObject("Shell.Application")
Set FSO = CreateObject("Scripting.FileSystemObject")
strPath = FSO.GetParentFolderName (WScript.ScriptFullName)
If FSO.FileExists(strPath & "\MAIN.VBS") Then
objShell.ShellExecute "wscript.exe", _
Chr(34) & strPath & "\MAIN.VBS" & Chr(34), "", "runas", 1
Else

MsgBox "Script file MAIN.VBS not found"
End If

You'll see see the UAC elevation dialog as in the figure below:
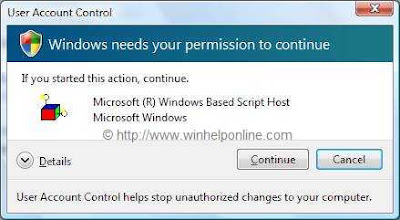
Once user clicks Continue to approve, the main script is launched, which runs under administrator privileges.

NOTE: The sample wrapper script above, looks for the main script (Main.vbs) in the same folder where the wrapper script resides. Feel free to alter the code to customize it according to your requirements, or to add error handling routines if you want. Also, it would help the end-user if you give the wrapper script an intuitive name, such as launch.vbs or run.vbs.
VBScripts and UAC elevation

VBScripts and UAC elevation

With User Account Control (UAC) enabled in Windows Vista, one needs to open an elevated Command Prompt in order to run scripts under administrative privileges. Although the elevated Command Prompt accomplishes the task, the question How to run as script under elevated privileges, without using the Command Prompt? comes to our mind.

Applications can make use of manifest files (using RequireAdministrator flag) to show the elevation dialog when run. As far as I know, there is no such option for scripts. Using the ShellExecute method, you can elevate a script by passing the runas parameter. Thanks to Jim Barry for tipping me off about the ShellExecute method of Shell.Application object. Using Jim's suggestions, my original script was condensed down to a great deal. Use one of these methods to run VBScripts elevated.

Method 1

This re-launches the current VBScript as administrator (elevated) if the script has no command-line arguments passed. When re-launching the script as administrator, simply pass a bogus argument so that the script does not run in a cyclic loop.

If WScript.Arguments.length =0 Then
Set objShell = CreateObject("Shell.Application")
'Pass a bogus argument with leading blank space, say [ uac]
objShell.ShellExecute "wscript.exe", Chr(34) & _
WScript.ScriptFullName & Chr(34) & " uac", "", "runas", 1
Else
'Add your code here
End If

Method 2

This method uses a stub or wrapper script which runs the main VBScript elevated using the runas verb.

Set objShell = CreateObject("Shell.Application")
Set FSO = CreateObject("Scripting.FileSystemObject")
strPath = FSO.GetParentFolderName (WScript.ScriptFullName)
If FSO.FileExists(strPath & "\MAIN.VBS") Then
objShell.ShellExecute "wscript.exe", _
Chr(34) & strPath & "\MAIN.VBS" & Chr(34), "", "runas", 1
Else

MsgBox "Script file MAIN.VBS not found"
End If

You'll see see the UAC elevation dialog as in the figure below:

Once user clicks Continue to approve, the main script is launched, which runs under administrator privileges.

NOTE: The sample wrapper script above, looks for the main script (Main.vbs) in the same folder where the wrapper script resides. Feel free to alter the code to customize it according to your requirements, or to add error handling routines if you want. Also, it would help the end-user if you give the wrapper script an intuitive name, such as launch.vbs or run.vbs.
Windows Vista Shutdown.exe - Maximum allowed timeout value is 600 Seconds

Problem

I used to schedule system shutdown using the command prompt and desktop shortcuts on my old XP SP2 machine: (For example shutdown.exe /s /t 1200). When I try to do this from the command prompt in Vista, I get the shutdown.exe help text displaying after the prompt - almost as if it is ignoring the switches.

Workaround

In Windows XP, there is no upper limit on the timeout value for shutdown.exe tool. Whereas in Windows Vista, the maximum timeout value accepted is 600 seconds (that is, 10 minutes). So, to configure the machine to shutdown in 2 or 3 hours from the current time, you may need to use shutdown.exe in a script or a batch file. You may use my script below:

'Launches "shutdown.exe /s /t xxx" - This script is a workaround...
'... for the 600 seconds time-out limit in Vista.
'Created on March 30, 2007
'Copyright © 2007 Ramesh Srinivasan.
'Winhelponline.com - http://www.winhelponline.com

Set objShell = CreateObject("Wscript.Shell")
strMsg = "Enter the shutdown timeout period (in Seconds)"
iSec = trim(InputBox (strMsg,"Shutdown timeout value",750))
if iSec = "" then wscript.quit
if iSec > 600 then
iSleep = int(iSec) - 600
iSleep = iSleep * 1000
WScript.Sleep iSleep
objShell.Run "shutdown.exe /s /t 600"
else
objShell.Run "shutdown.exe /s /t " & iSec
end If

Copy the above code to Notepad and save the file with .vbs extension (say, turnoff.vbs). To initiate a shutdown, double-click the script and enter the timeout value in Seconds.

The script works this way: If the timeout value entered by the user exceeds 600 seconds, the script sleeps for the exceeded value (i.e., - 600 Seconds) and then invokes Shutdown.exe passing 600 (seconds) as the timeout value.

Note that you can accomplish the same using the sleep.exe tool from the Windows Resource Kit Tools, and using them in a Batch file.

An Utility to Unassociate File Types in Windows 7 and Vista

The utility discussed in this article helps you unassociate a file type quickly in your Windows Vista or Windows 7 PC. Windows 7 & Vista do not provide a GUI option to unassociate file types. That's the reason I wrote this simple tool.

Unassociate file types in Windows 7 & Windows Vista

  • Download unassoc.zip from the Attachments section, and save to Desktop
  • Extract the contents to a folder and run the file unassoc.exe
  • Select the file type from the list
  • Click Remove file association (User)

The user-specific association for the chosen file type is now removed from the registry. The system will now use the global file association settings.

Screenshot

More information

Command Description
Remove file association (User) Removes the user-specific association (via the Open With dialog) for the chosen file type. Note that this button will remain dimmed if there is no user-specific association for the file type.
Delete file type Deletes the file type completely from the registry. Both the user-specific and global associations for the chosen file type is removed.
Refresh list Refreshes the list box contents.